Wednesday, August 8

How to Update previous Image URL During Update Mode?

Here i am showing you how to bind previous image url in a hidden field and Update that same one as well as different image url.


#region Update By NomineeID
        public void UpdateNomineeByID()
        {

            UHRMS_Nominee objNominee = new UHRMS_Nominee();
            objNominee.Employee_ID = int.Parse(Request.QueryString["EmployeeID"]);
            objNominee.Emp_Nominee_ID = int.Parse(hdnNomineeID.Value);
            objNominee.Relationship = TxtRelationship.Text;
            objNominee.Nominee_Name = TxtName.Text;
            //**************************************************************************//
            string Dob = TxtDob.Text;
            DateTimeFormatInfo dateTodateInfo = new DateTimeFormatInfo();
            dateTodateInfo.ShortDatePattern = "dd/MM/yyyy";
            DateTime validDObDate = Convert.ToDateTime(Dob, dateTodateInfo);
            //**************************************************************************//
            objNominee.Date_of_Birth = validDObDate;
            TextBox txtAddress = (TextBox)NomineeAddress.FindControl("txtAddress");
            objNominee.Address = txtAddress.Text;
            DropDownList ddlCity = (DropDownList)NomineeAddress.FindControl("ddlCity");
            objNominee.City_ID = int.Parse(ddlCity.SelectedItem.Value);
            TextBox txtZip = (TextBox)NomineeAddress.FindControl("txtZipCode");
            objNominee.Zip_code = txtZip.Text;
            TextBox txtPhone = (TextBox)NomineeAddress.FindControl("txtPhoneNo");
            objNominee.Phone_No = txtPhone.Text;
            TextBox txtMob = (TextBox)NomineeAddress.FindControl("txtFaxNo");
            objNominee.Mobile_No = txtMob.Text;
           
            objNominee.Email_ID = TxtEmailID.Text;
            objNominee.Modified_On = DateTime.Now;
            objNominee.ModifiedBy = 1;
            objNominee.Is_Active = true;
            objNominee.Is_Deleted = false;
            //**************************************************************************//

            if (FileUpload1.HasFile == false)
            {
             //Bind your image url in a hidden field hdnPhotoURL.Value="Image Url From Your Database";

                string[] photo = hdnPhotoURL.Value.Split(new char[] { '.' });
                int i = photo.Length;
                string extension = photo[i - 1];
 //if you do not want to change the name of that photo url you just take another hiddenfield and store the previous Employee Name and pass the value like TxtName.Text="Your previous name from database" ;
                string NewPhoto = Request.QueryString["Employee_ID"] + TxtName.Text + "." + extension;
                objNominee.Photo = NewPhoto;
              
            }
            else
            {
                //********** To rename the uploaded photo ************//
                string[] photo = FileUpload1.FileName.Split(new char[] { '.' });
                int i = photo.Length;
                string extension = photo[i - 1];
                string NewPhoto = Request.QueryString["Employee_ID"] + TxtName.Text + "." + extension;
                objNominee.Photo = NewPhoto;
                string newFile = "";
                for (int j = 0; j < i - 2; i++)
                {
                    newFile += photo[j];
                }

                //**********************************************************//

                FileUpload1.SaveAs(Server.MapPath("~/images/ERP/HRMS/Nominee/" + NewPhoto));

            }
            ERPManagement.GetInstance.UpdateNomineeByID(objNominee);
        }

        #endregion


Thanks 

    Shibashish Mohanty


Friday, August 3

How to Create a Pie Chart in asp.net?

Here, i am discussing about , how to create a pie chart in asp.net

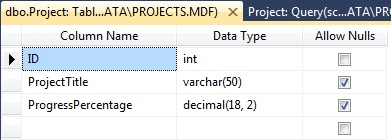
Step-1: My database Overview.


Step-2: Insert your values into your table.
Step-3: Then add a chart control to your page.

<asp:Chart ID="Chart1" runat="server">
<Series>
<asp:Series Name="Series1" ChartType="Pie">
</asp:Series>
</Series>
<ChartAreas>
<asp:ChartArea Name="ChartArea1">
</asp:ChartArea>
</ChartAreas>
</asp:Chart>
Step-4: Then add this code behind method to your page and call this method whenever you want to load your chart.

protected void Load_Chart()
{
SqlConnection con = new SqlConnection("------- Your connection string--------“);
SqlCommand com;
com = new SqlCommand("select ProjectTitle,ProgressPercentage from Project", con);
DataTable dt = new DataTable();
SqlDataAdapter da = new SqlDataAdapter(com);
da.Fill(dt);
Chart1.DataSource = dt;
Chart1.DataBind();
Chart1.Series[0].XValueMember = "ProjectTitle";
Chart1.Series[0].YValueMembers = "ProgressPercentage";
Chart1.Series[0].ToolTip = "Completed : " + "#PERCENT";//--Used to show tooltip
Chart1.ChartAreas[0].Area3DStyle.Enable3D = true;
}
Step-5: The final output:
Here is My Output with ToolTips:

Thanks Shibashish Mohanty

Dynamically Create a Column Chart in Asp.Net

Step-1: Create a table in your database.


Step-2: Insert your values into your table.
Step-3: Then add a chart control to your page.

<asp:Chart ID="Chart1" runat="server">
<Series>
<asp:Series Name="Series1">
</asp:Series>
</Series>
<ChartAreas>
<asp:ChartArea Name="ChartArea1" Area3DStyle-Enable3D="true" >
</asp:ChartArea>
</ChartAreas>
</asp:Chart>
Step-4: Then add this code behind method to your page and call this method whenever you want to load your chart.
protected void Load_Chart()
{
SqlConnection con = new SqlConnection("---Your Connection string---“);
SqlCommand com;
com = new SqlCommand("select ProjectTitle,ProgressPercentage from Project", con);
DataTable dt = new DataTable();
SqlDataAdapter da = new SqlDataAdapter(com);
da.Fill(dt);
Chart1.DataSource = dt;
Chart1.DataBind();
Chart1.Series[0].XValueMember = "ProjectTitle";
Chart1.Series[0].YValueMembers = "ProgressPercentage";
Chart1.Series[0].ToolTip = "#VAL";
Chart1.ChartAreas[0].AxisX.Interval = 1;
}
Step-5: The final output:
Output with showing tool tip:

Thanks Shibashish Mohanty

How to add a TreeView inside a DropDownList

Step-1: Add a TextBox to your Page.


<asp:TextBox ID="Module" runat="server"></asp:TextBox>
Step-2: Add a Panel and place a treeview inside it.
<asp:Panel ID="pnl" runat="server">
<asp:TreeView ID="ModuleTreeView" runat="server" ShowLines="true" PopulateNodesFromClient="false" BackColor="#99CCFF" style="width:100%" ShowExpandCollapse="false">
</asp:TreeView>
</asp:Panel>
Step-3: Add a Ajax DropdownExtender and set its TargetControlID to the TextBox.
<asp:DropDownExtender ID="DropDownExtender1" runat="server" TargetControlID="Module"
DropDownControlID="pnl">
</asp:DropDownExtender>
Step-4: Then write your own method to bind the treeview.

The final output is:

Thanks Shibashish Mohanty

Data Binding in a TreeView in Asp.Net?

In this example, I am showing you how to bind a treeview. Here, I am having a table in database where we store Modules and their sub-modules having parent-child like relationship.
Step-1: Add a TreeView to your .aspx Page.


<asp:TreeView ID="ModuleTreeView" runat="server" ShowLines="true"
PopulateNodesFromClient="false" BackColor="#99CCFF" style="width:100%"
ShowExpandCollapse="false">
</asp:TreeView>
Step-2: Add a table named "Module" to your database which will store all modules and sub-modules.

Step-3: Insert some values into your table.
All those modules which do not have any parent modules, their ParentModuleID is set to '0(Zero)'.
Step-4: Add these following code behind methods to the page.
SqlConnection con = new SqlConnection("----Your Connection String----");
SqlCommand com;
protected void Page_Load(object sender, EventArgs e)
{
ModuleTreeView.ExpandAll();
FillTreeView();
}
//----- Get all the module details from database -----//
public DataTable GetModuleDetails()
{
com = new SqlCommand("select ModuleID,ModuleName,ParentModuleID from Module", con);
SqlDataAdapter da = new SqlDataAdapter(com);
DataTable dt = new DataTable();
da.Fill(dt);
return dt;
}
//----Method to fill the treeview-----//
public void FillTreeView()
{
DataTable Modules = new DataTable();
Modules = GetModuleDetails();
ModuleTreeView.Nodes.Clear();
PopulateTreeNode(Modules, null, 0);
}

//----- Method to bind the treeview nodes as per the moduleID and ParentModuleID-----//
private void PopulateTreeNode(DataTable ModuleList, TreeNode parent, int parentID)
{
TreeNodeCollection baseNodes;
TreeNode node;
if (parent == null)
{
baseNodes = ModuleTreeView.Nodes;
}
else
{
baseNodes = parent.ChildNodes;
}
foreach (DataRow dtRow in ModuleList.Rows)
{
if (int.Parse(dtRow["ParentModuleID"].ToString()) == parentID)
{
node = new TreeNode();
node.Text = dtRow["ModuleName"].ToString();
node.Value = dtRow["ModuleID"].ToString();
node.SelectAction = TreeNodeSelectAction.Select;
baseNodes.Add(node);
PopulateTreeNode(ModuleList, node, int.Parse(dtRow["ModuleID"].ToString()));
}
}
ModuleTreeView.ExpandAll();
}

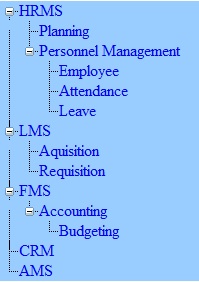
Now we are done and we can find the result by debugging the page.
The Final Output:

Thanks shibashish mohanty


.

ShibashishMnty
shibashish mohanty